SynApp2 Tutorial - A Human Resources Application for Oracle® Database
Follow along as we take just a few minutes to walk through the actual creation of a complete web application and a full set of PDF reports, based on the venerable Oracle HR (OEHR) database schema.
SynApp2 generated applications fully integrate with the power and security of the Oracle Database environment. If you’re familiar with web development using Oracle Database technology and tools, and especially Oracle Application Express (APEX), this presentation will be particularly interesting.
Here’s a look at the entity relationship diagram (ERD) for the database/schema design we’ll be using:
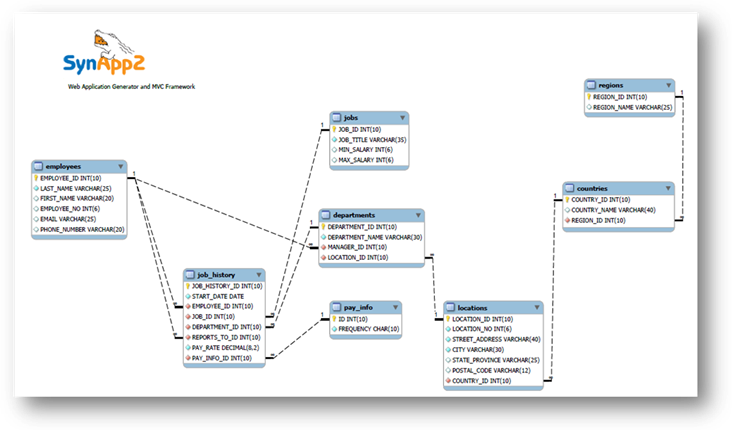
Figure 1 - HRV2 Entity Relationship Diagram
The design of the HRV2 (i.e., HR version 2) database/schema varies somewhat from the traditional HR example database that is used for countless Oracle Database demonstrations and tutorials. The self-referencing foreign key EMPLOYEES.MANAGER_ID has been eliminated. This design also avoids the UPDATE_JOB_HISTORY trigger, and the ADD_JOB_HISTORY stored procedure, to indirectly affect the JOB_HISTORY table. Rest assured that stored procedures and SynApp2 get along perfectly well. They’re just being left out for this presentation.
All historically significant changes are applied directly to the JOB_HISTORY table, and include:
· Start Date
· Job
· Department
· Reports To/Manager
· Pay Rate/Salary
· Pay Period/Frequency
Numerous one-to-many and many-to-many table record relationships are modeled by the HRV2 design. The implementation details appear in the table below:
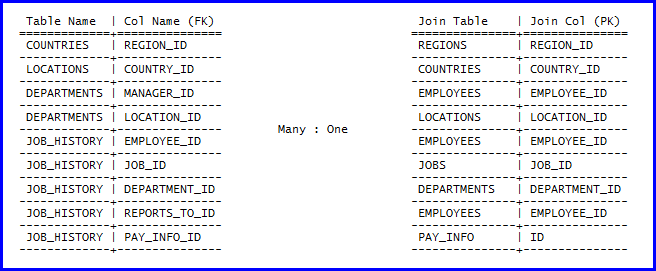
All of the table relations for this tutorial are maintained in a single table and were created in mere seconds using the SynApp2 KeyMap page. Those steps are part of the database definition and are omitted from this presentation.
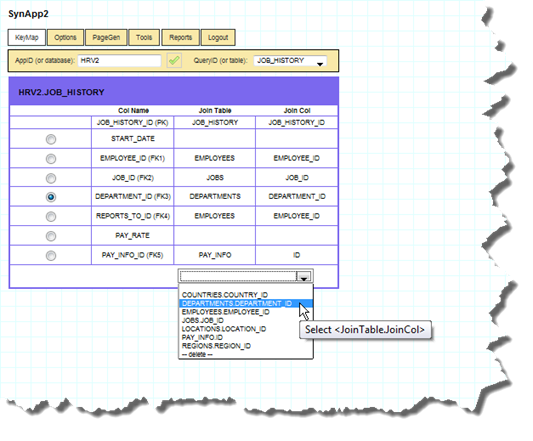
Figure 2 - using SynApp2 KeyMap to declare table relations
Note that adherence to SynApp2 key naming conventions
eliminates any need for a mapping table. There is a detailed discussion of
table relations, foreign key and other database-level constraints in the Setup
Guide for this walk through tutorial.
Tutorial Walk through
With your web browser, navigate to the SynApp2 index/welcome page.
You’ll have to interpret the instructions for your particular configuration.
Typically, if you direct your browser to the directory where SynApp2 is installed, the index.html page will automatically redirect to the SynApp2 welcome page: synapp2/synapp2.htm.
Once you get to the proper page, you’ll see the Login prompt.
Figure 3 - the Login prompt from the SynApp2 welcome page
Login to SynApp2 with the Oracle Database username you created earlier: HRV2
Case sensitivity is an issue here, so please login with all UPPERCASE characters for the username.
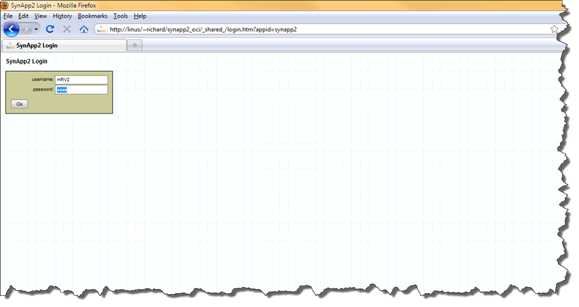
Figure 4 - the SynApp2 Login page connects to the Oracle Database instance with credentials of database user HRV2
After a successful login, the SynApp2 application navigation tabs appear.
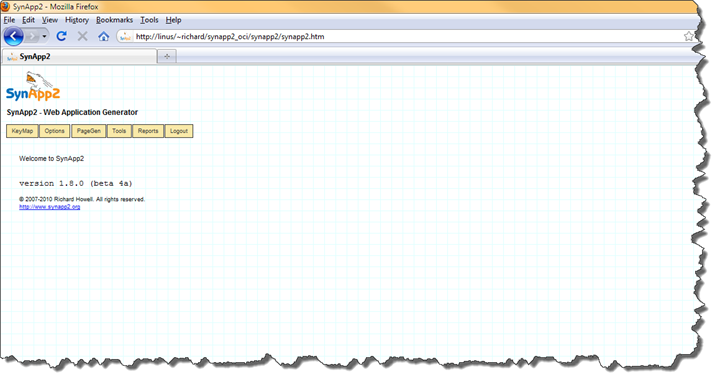
Figure 5 - the SynApp2 Welcome Page
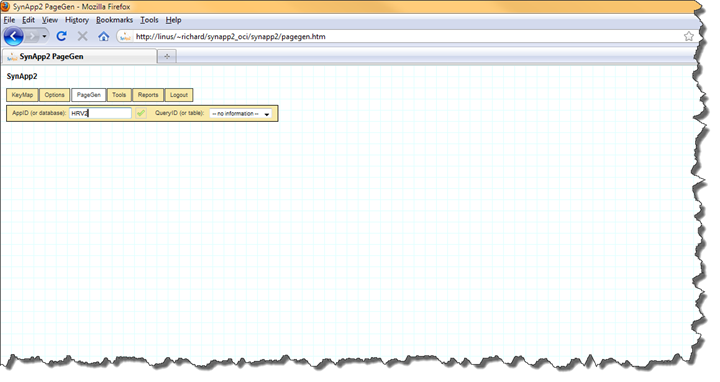
Figure 6 - Entering the AppID (or database)
Generating the HRV2 Application – the first cut
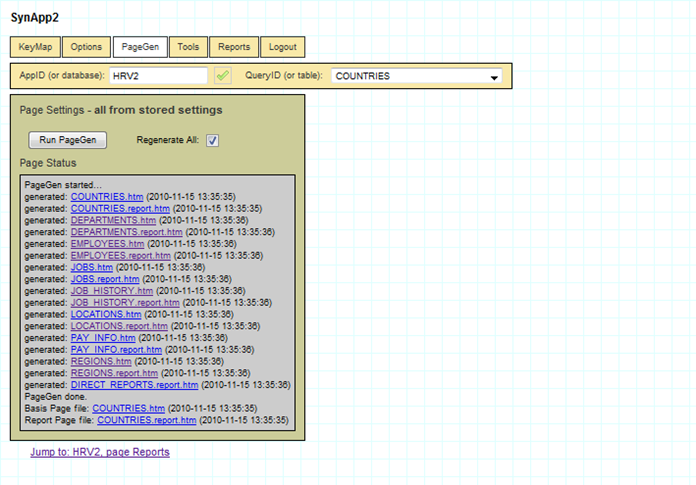
Navigate to the PageGen tab and click Run PageGen on the Page Settings panel.
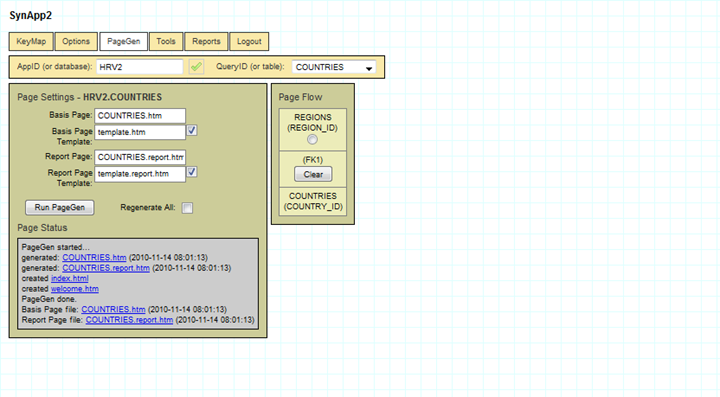
Figure 7 - Generating the COUNTRIES interactive GUI and report pages
The first click of the Run PageGen button generates a complete application – with:
· Index and welcome pages
· Authentication login/logout pages
· Application navigation tabs and sub-tabs
· Forms-based GUI for searching and browsing with – create, read, update and delete (CRUD)
· Report invocation page with a dedicated form to enter search/filter expressions and export options
· Neatly formatted PDF report is automatically laid out
All features of the application are available for immediate use.
Additional application elements (interactive GUI and reports pages) are added by selecting another QueryID (or table), and clicking the Run PageGen button. All of the new elements are instantly integrated with the existing ones.
It’s easy to supplement a page with additional capabilities for searching and selecting records of related tables. A few extra clicks, is all it takes.
Within seconds, an extremely useful tool is available. You can instantly exercise your data model and evaluate its effectiveness and suitability toward your information collection, analysis, reporting and decision support requirements.
Change the QueryID (or table) selection to DEPARTMENTS and then click Run PageGen. Repeat those steps until you have generated interactive GUI and report pages for all of the tables.
The sequence of generating the remaining elements for the HRV2 applications follows...
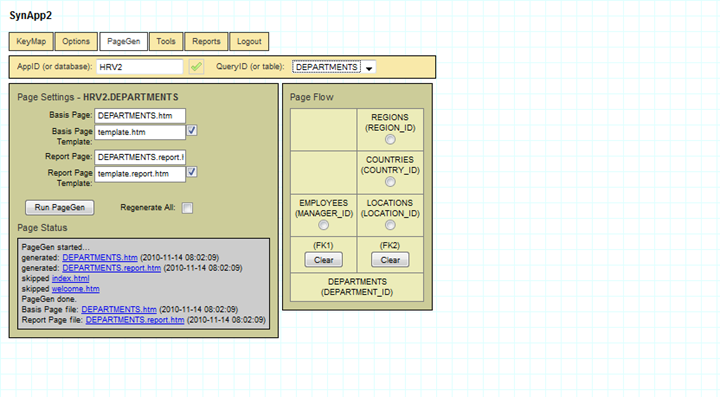
Figure 8 - Generating the DEPARTMENTS page
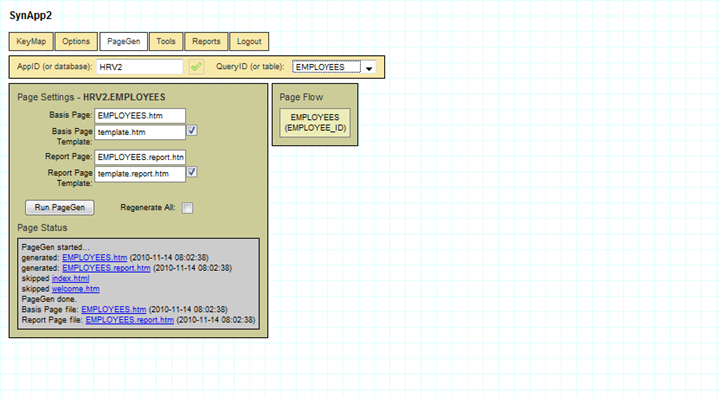
Figure 9 - Generating the EMPLOYEES page
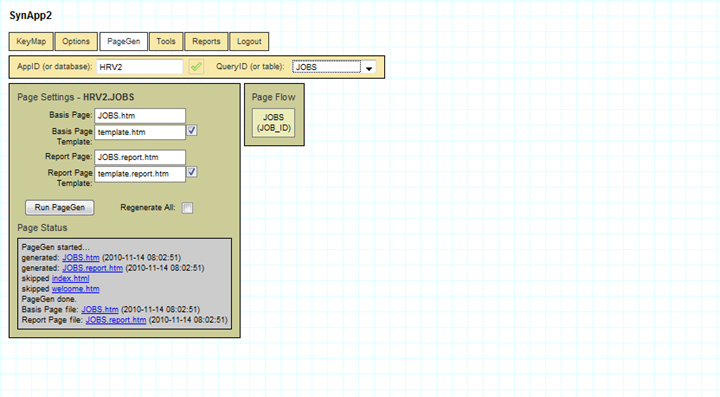
Figure 10 - Generating the JOBS page
Before you generate the JOB_HISTORY pages, click the Page Flow buttons as shown below, then Run PageGen.
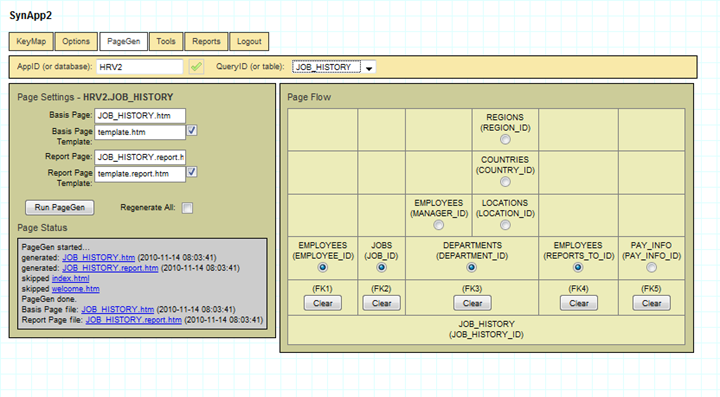
Figure 11 – Generating the JOB_HISTORY page with EMPLOYEES, JOBS, DEPARTMENTS and REPORTS_TO(EMPLOYEES) GUI in the Page Flow
Search and select forms for tables related to JOB_HISTORY are generated instead of list boxes. Searching and tabular select forms are more sensible than simple lists when dealing with large numbers of choices.

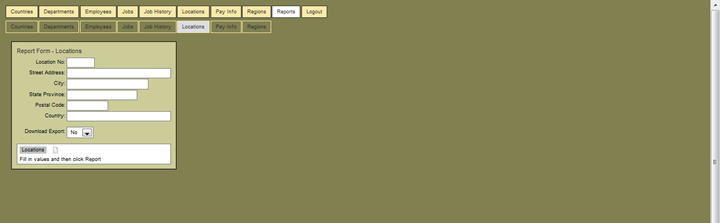
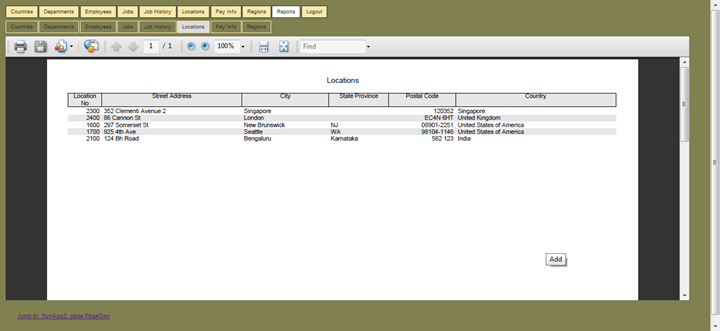
Figure 12 - Generating the LOCATIONS page

Figure 13 - Generating the PAY_INFO page
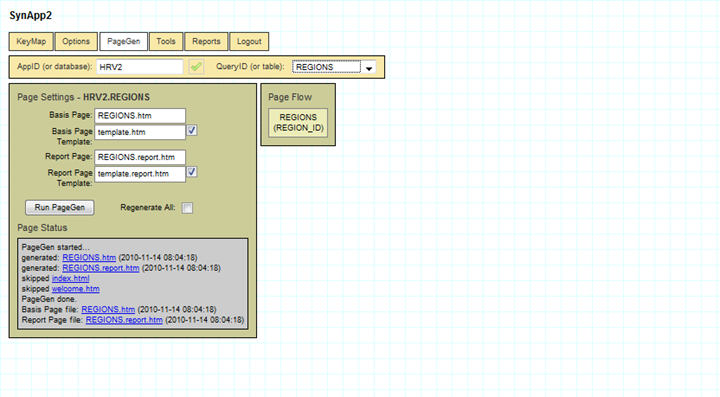
Figure 14 - Generating the REGIONS page
The generated application is compact and manageable. All of the application elements are established in a single subdirectory. Deployment of the application to another server is simple. Copy (FTP) the one folder, and you’re done.
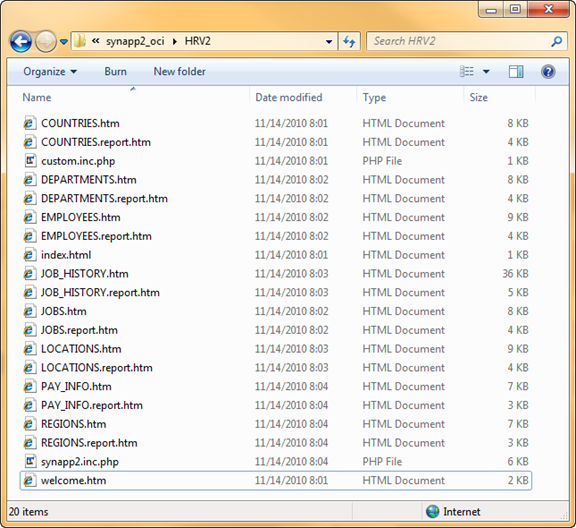
Figure 15 - All of the files for the HRV2 application
Virtually all of what gets generated consists of web pages with forms - clean W3C standards-compliant markup. A very small number of one-line JavaScript statements are generated with each page, to initialize simple associative maps. No procedural code is created. All page layout and display styles are controlled by CSS.
The functioning of all generated elements is implemented by shared code within the SynApp2 MVC framework.
Features related to assignment of default values, data validation, duplicate record prevention and orphan control are automatically included, based on the database definition. Customization and extending of the application is supported by numerous mechanisms.
Applications are encapsulated in a tiny set of files. The database DDL and SQL backups of the data can be subsequently created with near effortless automation. Absolutely everything can be placed under configuration management (source control), including the exact SynApp2 framework version used to create and run the application. You can manage it all with unprecedented ease and confidence, and get your brain around every single detail - without breaking a sweat.
The HRV2 Application is ready for use.
We just finished generating the Regions page, so click on either of the links to REGIONS.htm, from the Page Status panel.

Figure 16 -the newly created HRV2 application is settled on the Regions page
The 'breadcrumb' link at the bottom of the page will be used to return to the SynApp2 application. You’ll see a similar link on the SynApp2 pages. The links make it easy to jump back and forth between making and reviewing changes.
The following several figures show a few of the interactive GUI pages.

Figure 17 - the tabular Select Form on the Departments page
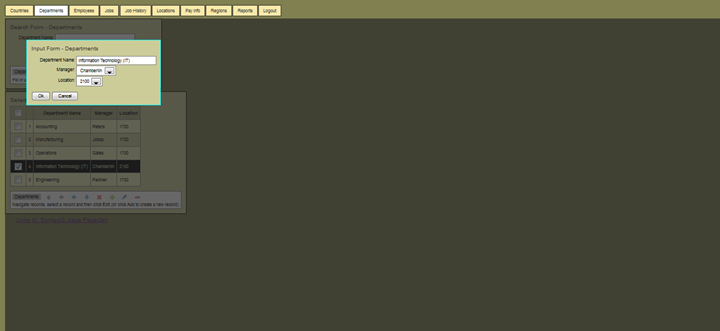
Figure 18 - the Input Form for Departments is used to enter or edit a record

Figure 19 - the Employees page has the same general features as the Departments page
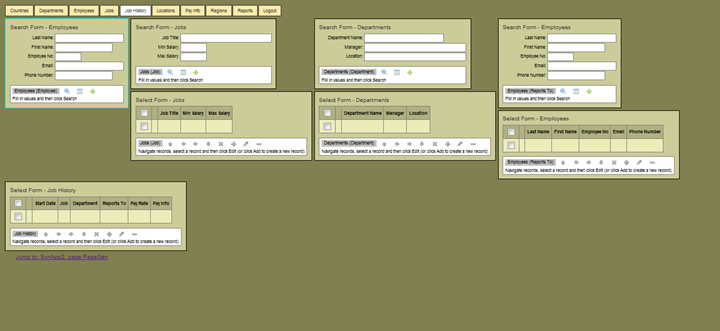
Figure 20 - the Job History page has a few more forms, all with the same general feature as all the other pages
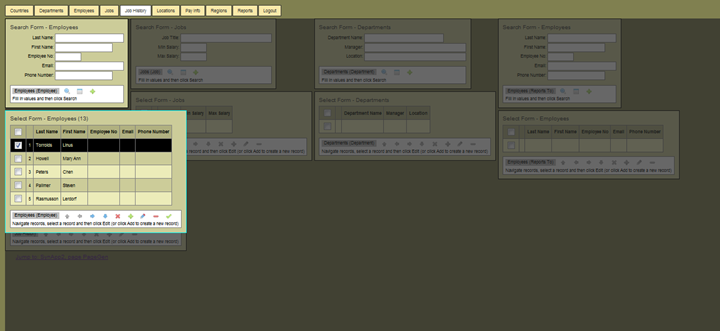
Figure 21 – searching, browsing and selecting Employees from the Job History page works exactly as it does on the Employees page
We’ll add a new employee record and then the first job history entry for: Neal McScott.
Click the add icon (green plus) on either Search Form or Select Form – Employees.
Enter the Last Name and First name for the new employee. Don’t bother with the other field/column values.
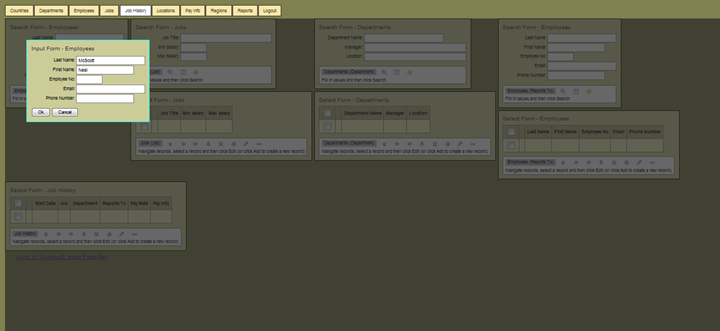
Figure 22 - adding a new EMPLOYEES record from the Job History page
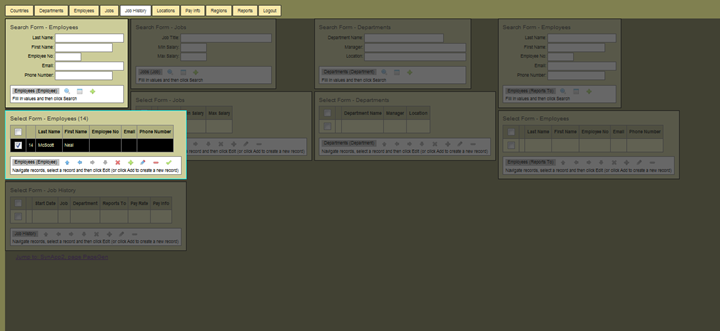
Figure 23 - the newly added record is automatically selected, ready for the next step in the Job History page flow
There are now 14 employee records and the one we just added is already conveniently selected. To move forward with the page flow, click the select icon (green check) at the far right of the control bar – or hit the Enter key. You can do either one, but using the keyboard is much less tedious, especially if you’re entering many records.
Note – ignore the temptation to click on the checkbox(s) that appear at the left of each row of any Select Form. Highlight a row by clicking within any row cell that has a heading. The row check boxes are only used for multi-select operations, which at the time of this writing, is limited to Delete. If you click the row number, the Input Form will be presented, allowing you to edit field/column values for that record.
Once the new employee has been selected, the Display Form – Employee reflects the choice.
Search and highlight one row for each of the related tables – Jobs, Departments and Employees (Reports To)
Click the Add icon (green plus) on Select Form – Job History to add a new record.
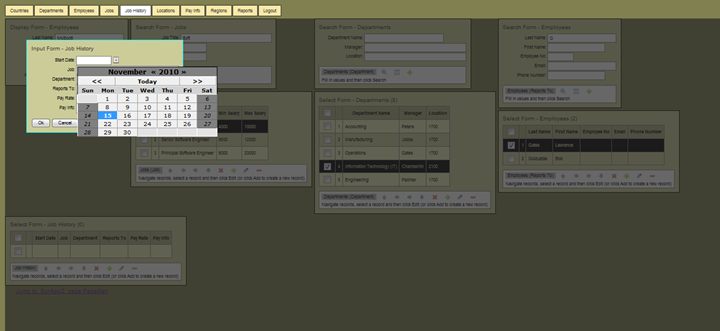
Figure 24 - once a record is selected for Jobs, Department and the Reports To Employee (i.e., Manager), a Job History record can be added
Input Form – Job History has the Job, Department and Reports To fields automatically filled in as read-only values.
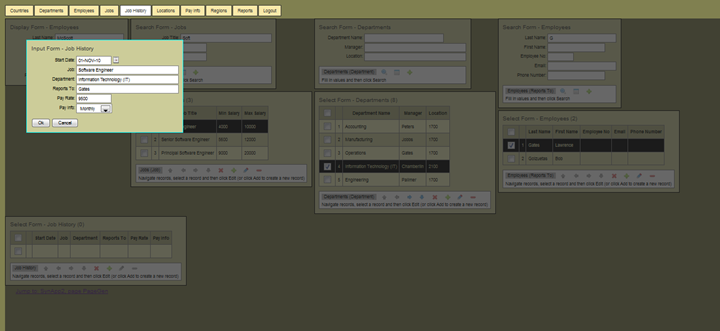
Figure 25 - click Ok to insert the new Job History record for Neal McScott
The layout and flow of this page was affected by the choices made from Page Gen.
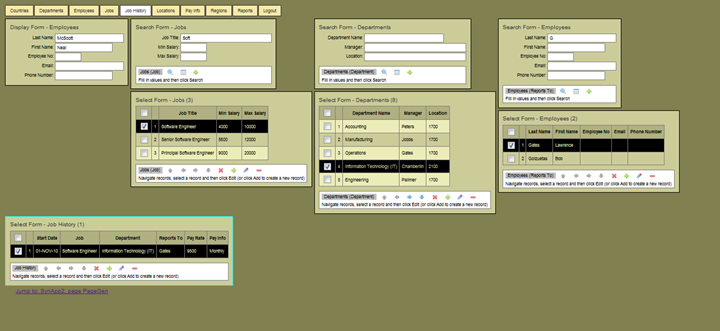
Figure 26 - the new record appears in the Job History table, confirming successful insertion to the database
Other Job History records can be added by searching and highlighting appropriate records from the supporting tables and then clicking the add icon (green plus) on Select Form – Job History. Oracle is case-sensitive, so be sure to capitalized appropriately when entering search values. You’ll get best results if you enter less, rather than more for your search terms.
All of the forms and page flows are designed to make good use of the keyboard. Try using arrows, page up, page down, escape and enter keys. Notice how the form control bar icons become enabled or disabled (grayed), depending on conditions. The specifics of using the SynApp2 generated application will be left for another time. Just know that there are many useful features and significant power built into every application.
Reports
Reports can be invoked at any time.
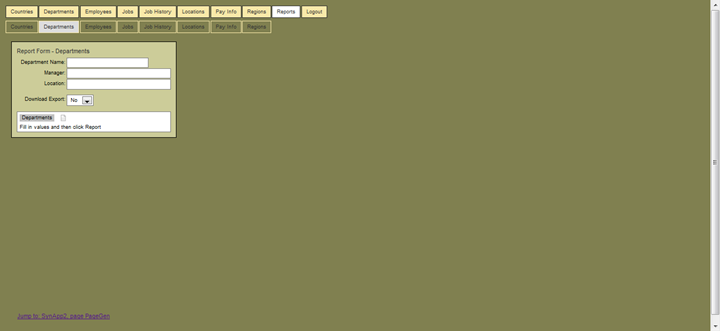
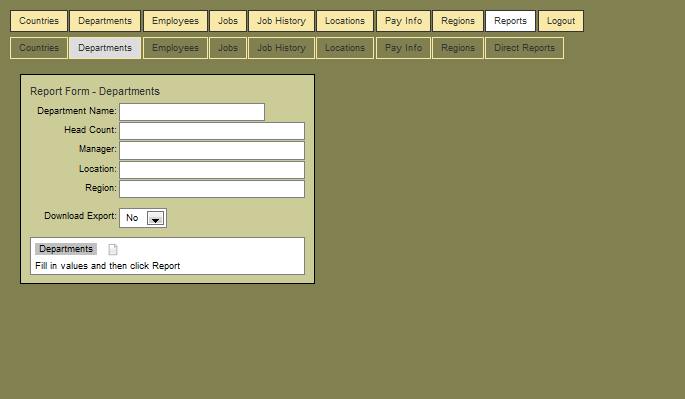
Figure 27 - the Report Form for Departments allows entering of search/filter information
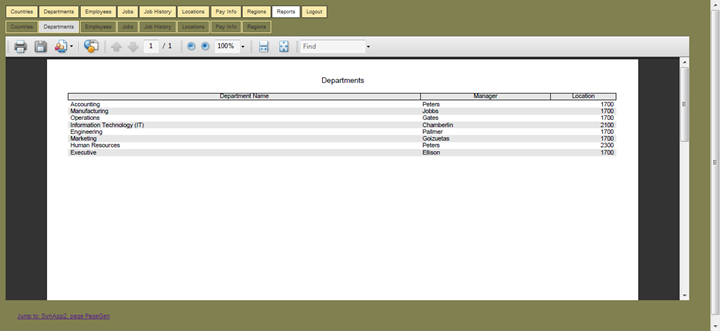
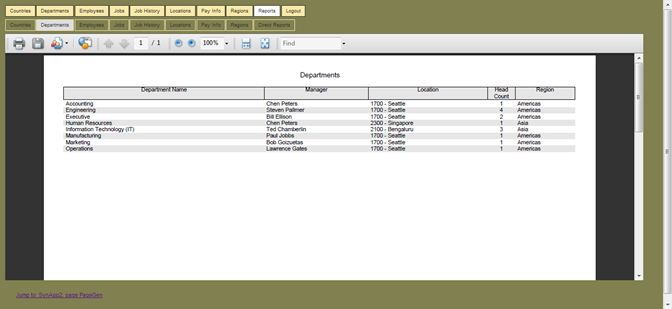
Figure 28 - the Departments report before any customization
Note that the value for Location comes from an ordinary column in "HRV2"."LOCATIONS"."LOCATION_NO" and it is not a naked foreign key value like the corresponding column in "HR"."LOCATIONS"."LOCATION_ID". The Location value is automatically expanded for "DEPARTMENTS"."LOCATION_ID" using the value of the first non-key column from "HRV2"."LOCATIONS", which happens to be "LOCATION_NO". It could just as easily be "STREET_ADDRESS" or some other column. SynApp2 normally hides raw column values for primary and foreign key fields as they are assumed to be surrogate values, rather than actual data.
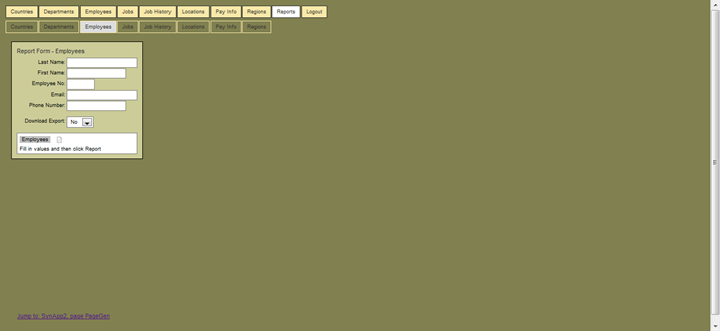
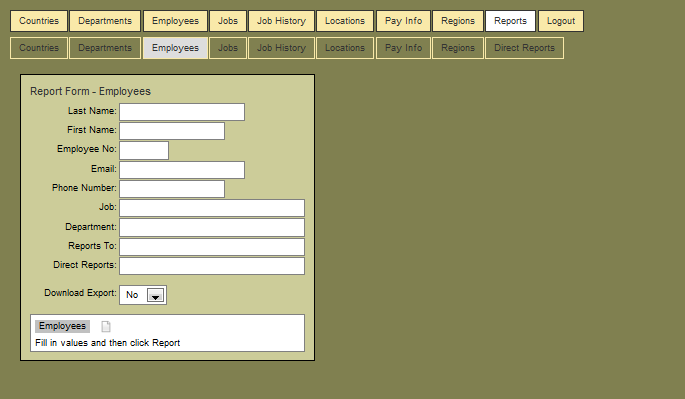
Figure 29 - Report Form - Employees works exactly the same way as the Search Form on the Employees and Job History pages

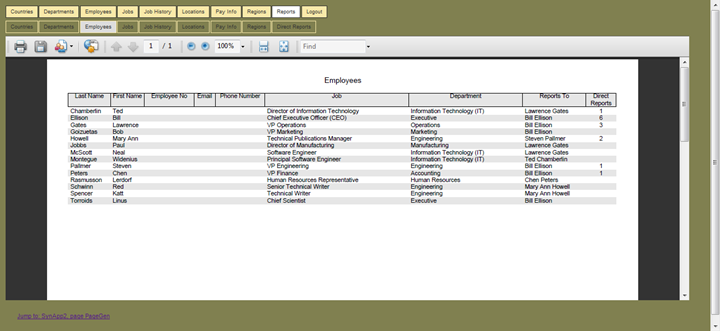
Figure 30 - a nice clean report layout for Employees
Any report can be printed or downloaded. Or you can export filtered report result rows to a tab-delimited text or Open Document Spreadsheet (ODS) file. Use custom processing features of SynApp2 to generate data in any other format you may require.
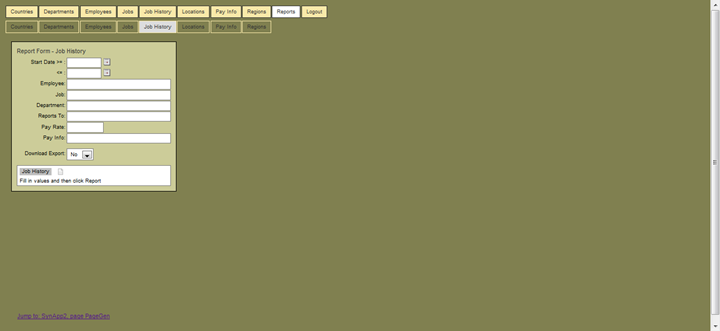
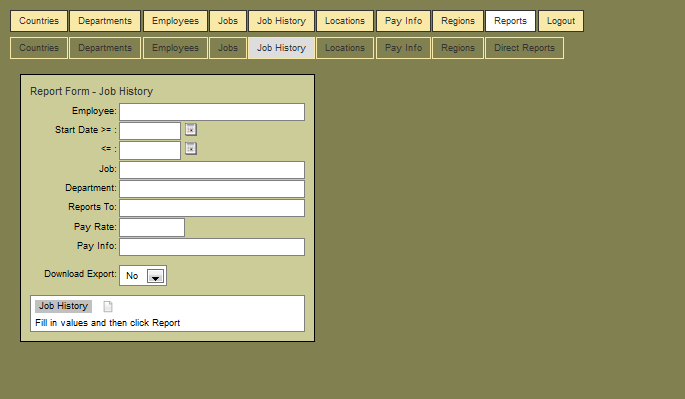
Figure 31 - the Job History Report Form incorporates date range entry with calendar date picker controls
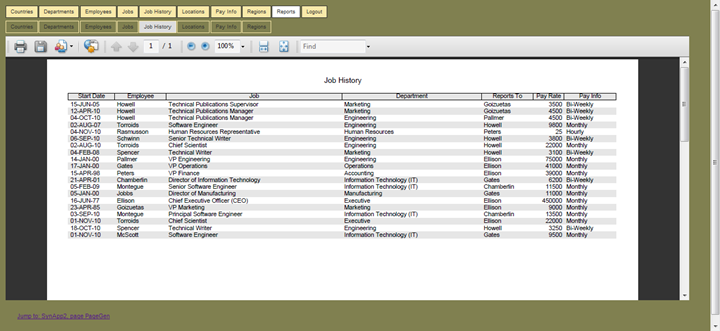
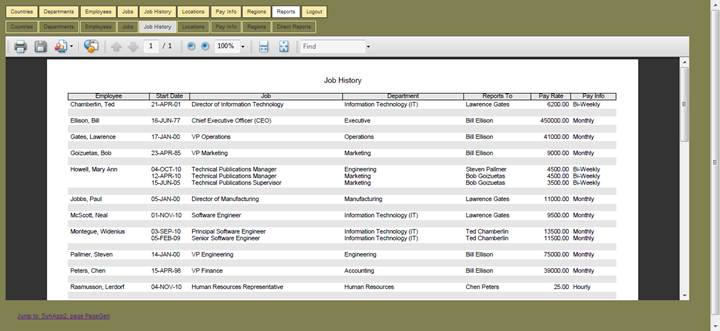
Figure 32 - the Job History report, even without any customization, is still pretty nice
The Job History report joins three (3) tables to the JOB_HISTORY table, and the EMPLOYEES table is joined twice – on two (2) different axes! And, there’s no hand coding whatsoever – none. It’s completely automatic. That’s really, - really - pretty darned slick. Go ahead – admit it.
SynApp2 has an extremely powerful SQL generator, masterfully integrated into its framework.
Watch for this report again, later in the presentation, and see what happens with a little bit of customization.
There is a fantastic amount of functionality and practical value incorporated into this first-cut of the HRV2 application. Take a moment to reflect on how nice the labels and headings are on the forms and reports. How much effort did that take? How much time was saved?
We got it all, in seconds - with just a few clicks. The natural structure of the database design and sensible conventions take the place of many, many time-consuming decisions and manually-entered configuration details. It could easily take hours, days - or even weeks - to do anything close this level of completeness with other Rapid Application Development (RAD) platforms and frameworks– including Application Express (APEX).
This is standard operating procedure for SynApp2. For any project, this is exactly how you do it.
Sure, there’s some compromise, but the gains are huge. SynApp2 is simple, open and flexible. There’s a lot that can be done to mitigate compromises and tune the system. The first level of tuning can be done with a bit of interactive 'customization', guided by the database structure and built upon each progressively established change.
Use the breadcrumb link to jump back to SynApp2 and continue with customization.
Customization
The most fundamental business rules that affect the content and flow of the generated application are gleaned directly from the database definition. There’s no need to re-declare basic rules. If you’ve got a good database design then your application flow is going to make sense across a spectrum of contexts. You and your users will find it straightforward to manipulate data and produce meaningful reports.
Automation doesn’t do everything. SynApp2 is designed to provide useful details without going overboard. You make adjustments for more or less detail through customization.
Much of the customization involves entering expressions that get applied to, or define, column values that appear in SQL results. Depending on the type of customization, a few SQL and/or PHP code snippets will produce exactly what you need. Expressions may be entered directly and/or may reference functions, either built in or defined by you, to generate or return some or all of a column expression. The various optional column expressions affect results at key points.
Customization can be managed by any combination of two techniques
· Interactively through the data structure-driven SynApp2 GUI
· Entries (SQL and/or PHP code) manually placed into the customization file(s)
A summary of all customization for the HRV2 application appear in the excerpts below:
DEPARTMENTS
· [MACRO]['DEPARTMENTS.MANAGER_ID'] = "EMPLOYEES.FIRST_NAME || ' ' || EMPLOYEES.LAST_NAME"
· [MACRO]['DEPARTMENTS.LOCATION_ID'] = "LOCATIONS.LOCATION_NO || ' - ' || LOCATIONS.CITY"
· [EXTRA]['DEPARTMENTS.DEPARTMENT_NAME']['HEAD_COUNT'] = extra_department_employee_count()
· [EXTRA]['DEPARTMENTS.LOCATION_ID']['REGION'] = "REGIONS.REGION_NAME"
· [ORDER] = "DEPARTMENT_NAME"
· [RFORM]['HEAD_COUNT'][COL_SIZE] = "6"
· [RFORM]['HEAD_COUNT'][COL_ALIGN] = "C"
EMPLOYEES
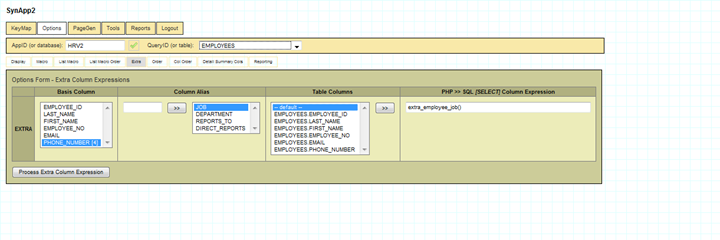
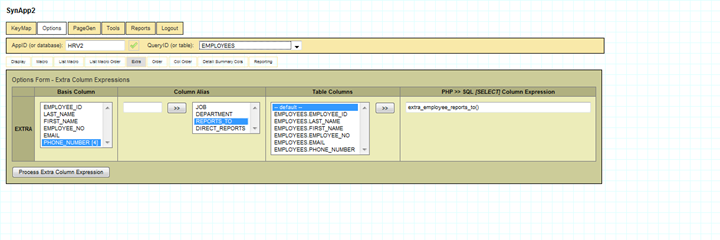
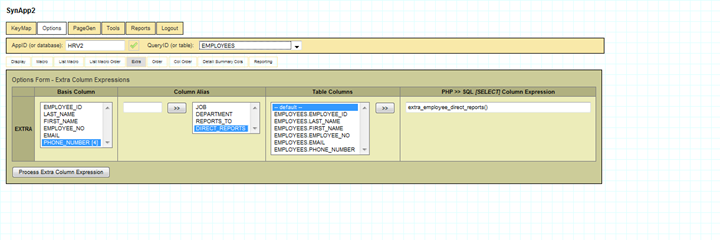
· [EXTRA]['EMPLOYEES.EMPLOYEE_NO']['JOB'] = extra_employee_job()
· [EXTRA]['EMPLOYEES.EMPLOYEE_NO']['DEPARTMENT'] = extra_employee_department()
· [EXTRA]['EMPLOYEES.EMPLOYEE_NO']['REPORTS_TO'] = extra_employee_reports_to()
· [EXTRA]['EMPLOYEES.EMPLOYEE_NO']['DIRECT_REPORTS'] = extra_employee_direct_reports()
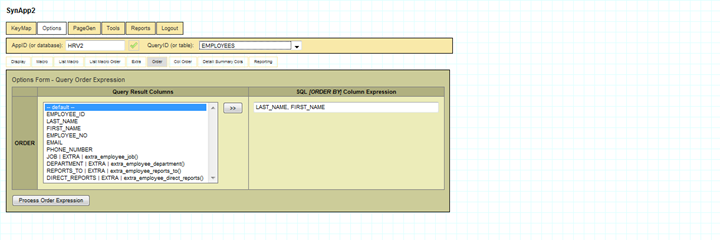
· [ORDER] = "LAST_NAME, FIRST_NAME"
· [RFORM]['EMPLOYEE_NO'][COL_SIZE] = "10";
· [RFORM]['PHONE_NUMBER'][COL_SIZE] = "10";
· [RFORM]['DIRECT_REPORTS'][COL_SIZE] = "6"
· [RFORM]['DIRECT_REPORTS'][COL_ALIGN] = "C"
JOB_HISTORY
· [MACRO]['JOB_HISTORY.EMPLOYEE_ID'] = "EMPLOYEES.LAST_NAME || ', ' || EMPLOYEES.FIRST_NAME"
· [MACRO]['JOB_HISTORY.REPORTS_TO_ID'] = "EMPLOYEES.FIRST_NAME || ' ' || EMPLOYEES.LAST_NAME"
· [ORDER] = "JOB_HISTORY_EMPLOYEE_ID || EMPLOYEE_ID, START_DATE desc"
· [RFORM][COL_ORDER] = "JOB_HISTORY_EMPLOYEE_ID"
· [FFORM][COL_ORDER] = "EMPLOYEE_ID,JOB_HISTORY_EMPLOYEE_ID"
· [DETAIL_SUMMARY_COLS][0] = "JOB_HISTORY_ID,JOB_HISTORY_EMPLOYEE_ID,1"
· [RFORM]['PAY_RATE'][COL_FORMAT] = "sprintf, %01.2f"
· [RFORM]['PAY_RATE'][COL_SIZE] = "8"
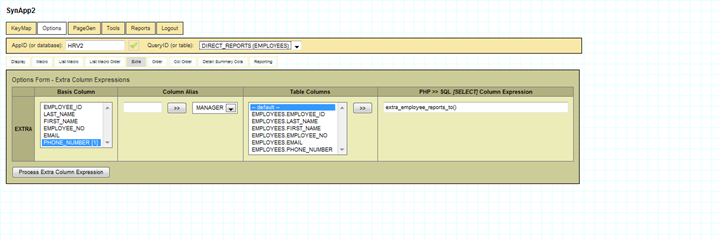
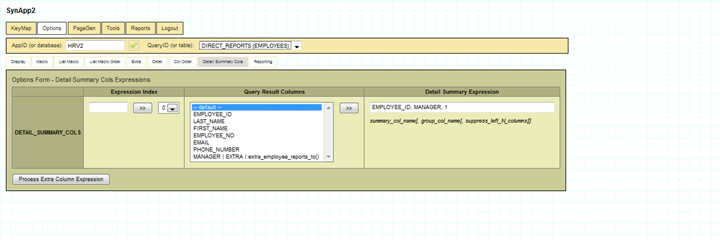
DIRECT_REPORTS(EMPLOYEES)
· [EXTRA]['EMPLOYEES.PHONE_NUMBER']['MANAGER'] = extra_employee_reports_to();
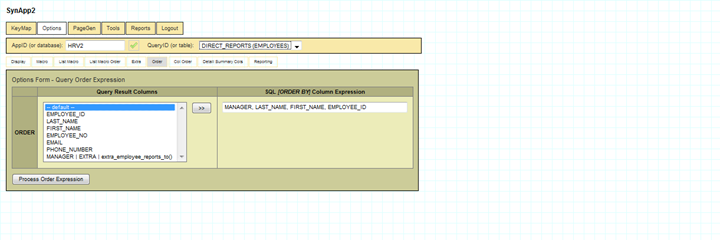
· [ORDER] = "MANAGER, LAST_NAME, FIRST_NAME, EMPLOYEE_ID";
· [RFORM][COL_ORDER] = "MANAGER";
· [DETAIL_SUMMARY_COLS][0] = "EMPLOYEE_ID, MANAGER, 1";
· [RFORM]['EMPLOYEE_NO'][COL_SIZE] = "10";
· [RFORM]['PHONE_NUMBER'][COL_SIZE] = "10";
Column values are often produced by simple concatenation. But sometimes, sophisticated sub-queries are used. The following wrapper functions make a neat and easy way to incorporate lengthy sub-query expressions.
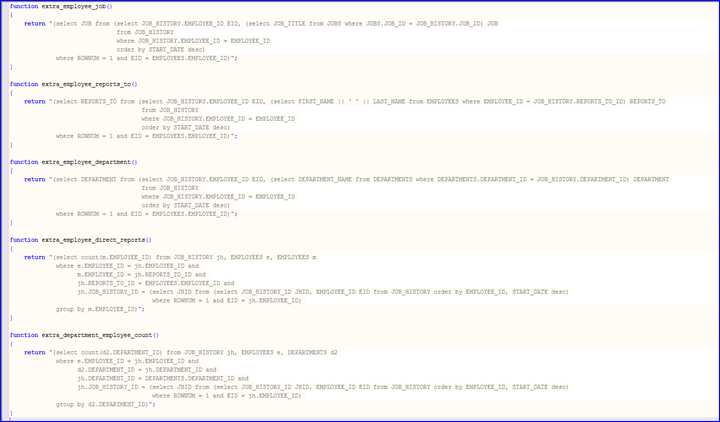
Figure 33 - SQL Expressions for Column Values
These particular SQL expressions, while created with expert knowledge, demonstrate how easily the power of Oracle Database can be harnessed by a typical SynApp2 generated application.
With some study, you’ll find ways to adapt these examples to other situations where finding the TOP-1 or counting the TOP-N rows of a constrained collection of historical details, neatly provides the exact answer you need.
These sub-query expressions can be reused within the HRV2 application to support a variety of data views. There is real power here, and it can be brought to bear - very quickly.
DEPARTMENTS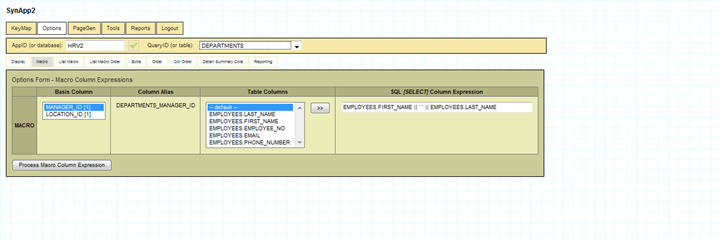
Figure 34 - this MACRO Column Expression defines the foreign key expansion of DEPARTMENTS.MANAGER_ID
MACRO column expressions override the default behavior of what SynApp2 calls – foreign key expansion. These two examples use simple concatenation to provide more complete column values.
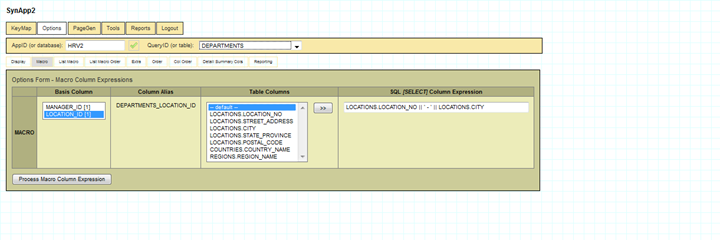
Figure 35 - the DEPARTMENTS.LOCATION_ID column will be expanded from a simple concatination of column values and literal text
EXTRA column expressions cause additional column values to appear in the result rows produced for/by the QueryID.
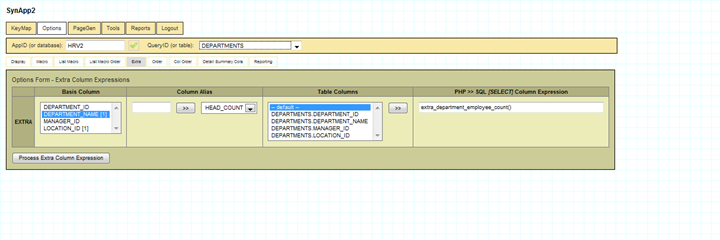
Figure 36 - this EXTRA Column Expression references a wrapper function that returns SQL code for a sub query to produce HEAD_COUNT

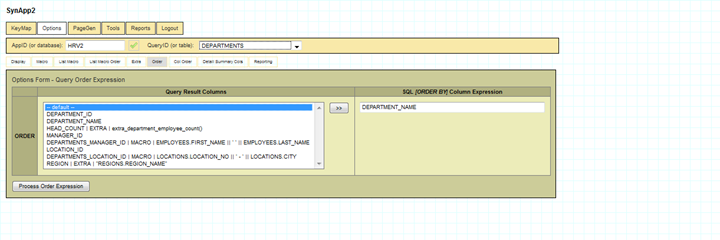
Figure 37 – rows for results produced by the DEPARTMENTS QueryID will be ORDERed by DEPARTMENT_NAME
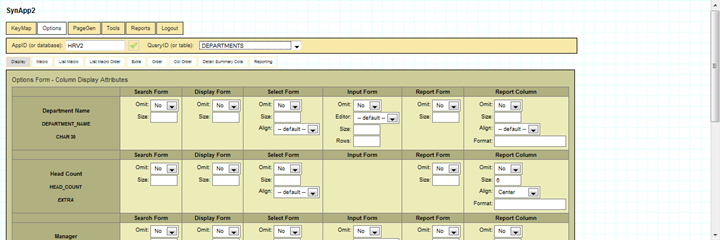
Figure 38 - the DEPARTMENTS Report Column for HEAD_COUNT will be Center'ed and have a fixed with of 6
EMPLOYEES

JOB_HISTORY
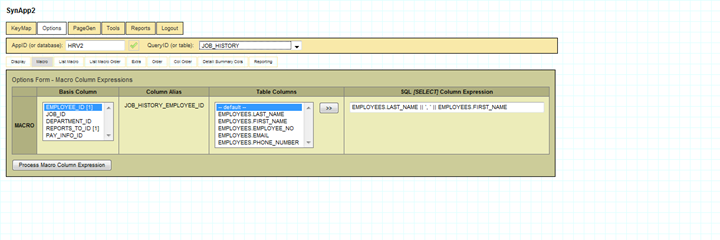
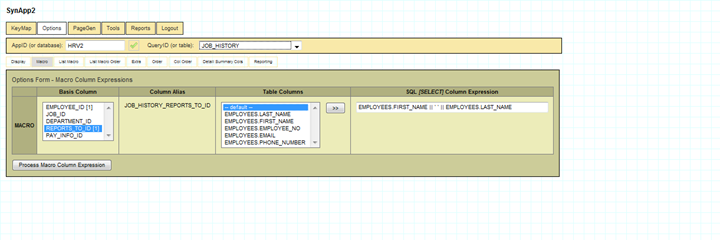
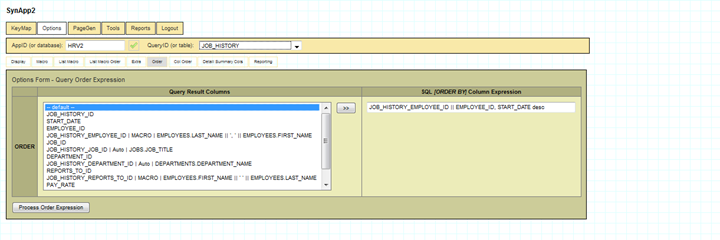
Figure 39 - this ORDER by expression will properly sort and group rows even EMPLOYEES have the same FIRST_NAME and LAST_NAME
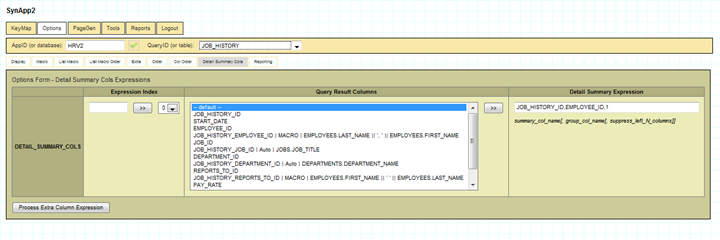
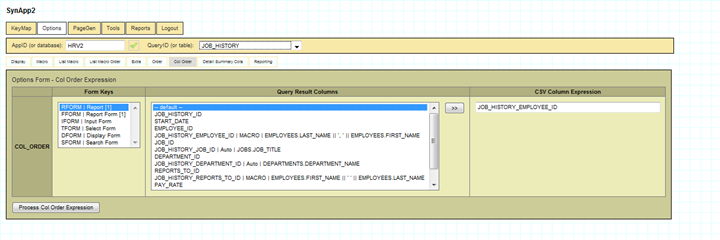
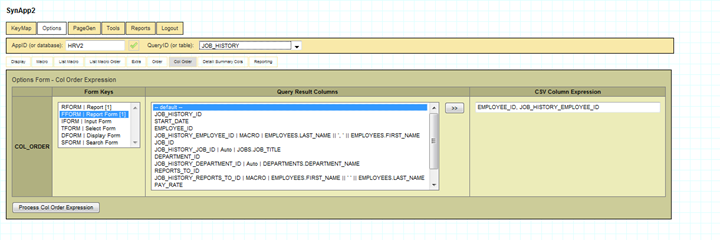
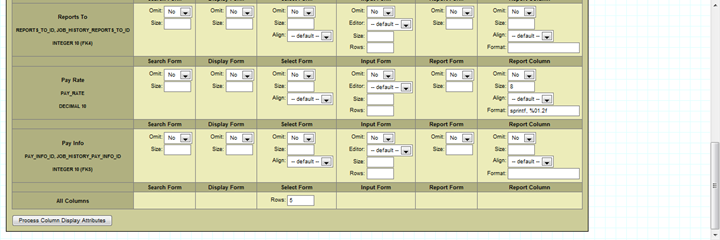
Figure 40 - the Report Column for PAY_RATE gets a cell width of 8 and formatted with the PHP function: sprintf using the format string: %012f
Column values of result rows can be formatted with a combination of techniques. You can specify formatting as part of the SQL column expression. And, you can specify post-process formatting – seen here - that gets applied after data is retrieved from the database, but before it is presented. You can use any PHP function, built in or user-defined. The implementation of your function can be anything you want, and can access the database or reach out through network connections.
Column values can be formatted as markup. You can easily incorporate images and links to documents.
DIRECT_REPORTS(EMPLOYEES)
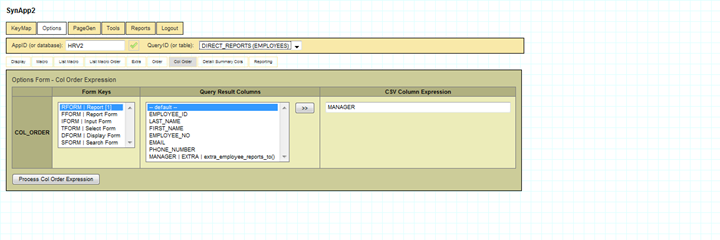
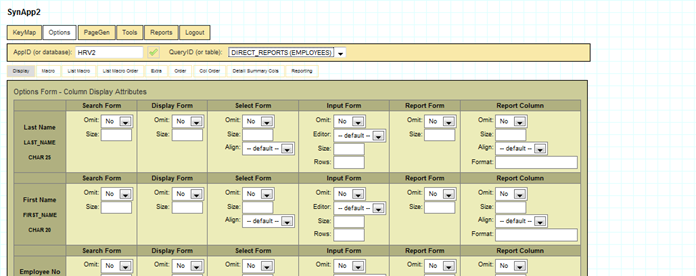
The column width settings for Employee No and Phone Number are purely cosmetic and included only because there is no sample data for these columns. SynApp2 lays out report columns based on actual content rather than column/field size. In the absence of data, we’re just coaxing the report layout to prevent the column headings from being crowded.
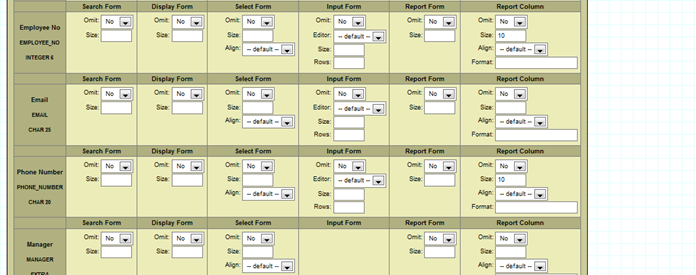
Figure 41 - adjusting report column size/width for better layout
Defining an Alternate Data View with a Secondary QueryID
With a relational database it’s possible to develop a variety of data cross-sections from the same set of data. Use the Tools QueryID feature to define and associate a secondary QueryID value with a table in the database. From there you can generate customized pages and reports. All of the new elements are instantly integrated and available from within the application.
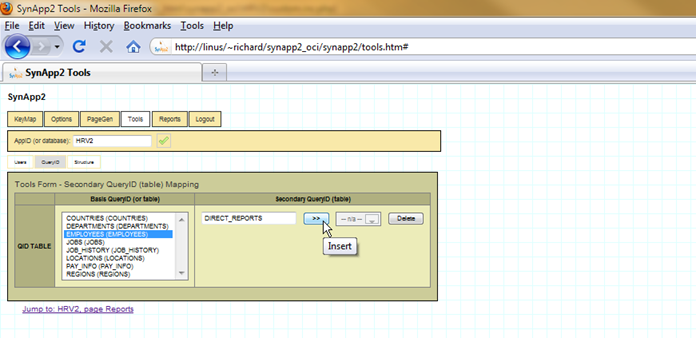
The Secondary QueryID for DIRECT_REPORTS(EMPLOYEES) sets up a named view that is essentially identical to what the QueryID (or table) EMPLOYEES produced before customization. We can now independently customize this view – QueryID – to drive elements of our application. The Direct Reports report was created by customizing this QueryID.
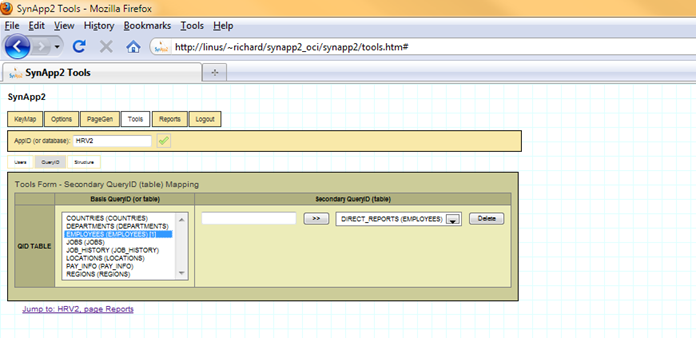
Figure 42 - A Secondary QueryID provides data analysis and visualization power similar to that of spreadsheet pivot tables
Reflecting the customizations with PageGen – Regenerate All
Now that we’ve done some customization, all of the changes get incorporated by checking Regenerate All and a click of the Run PageGen button.
Changes to database structure are accommodated just as easily. Make your changes and click the button.
Now there’s more information related to Departments. The effects of the EXTRA column HEAD_COUNT sub-query, along with the MACRO expression for the foreign key expansions of MANAGER_ID and LOCATION_ID are all visible. Search Form – Departments supports searching and filtering on all of the columns.
A little bit of change goes a long way.
After Customization
We can jump back into the HRV2 application with the breadcrumb link or from any of the page or report links on the PageGen Page Status panel.
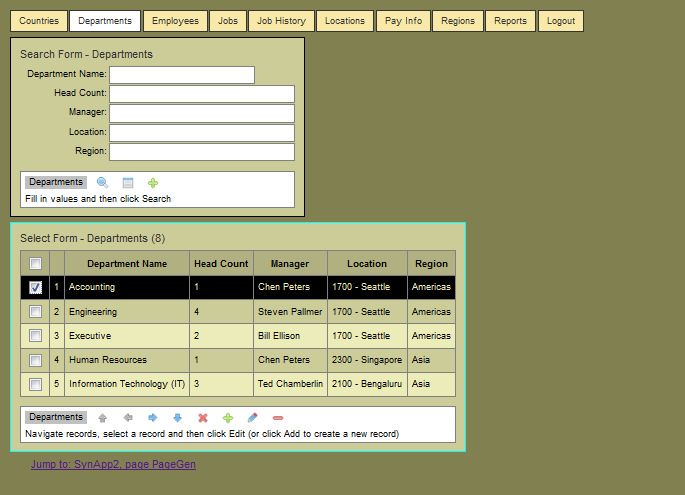
Figure 43 - the Departments forms reflect customization
The sort order is now alphabetical by Department Name. The Head Count for each department is appropriately computed and displayed. The Manager and Location column values have more complete expansion.
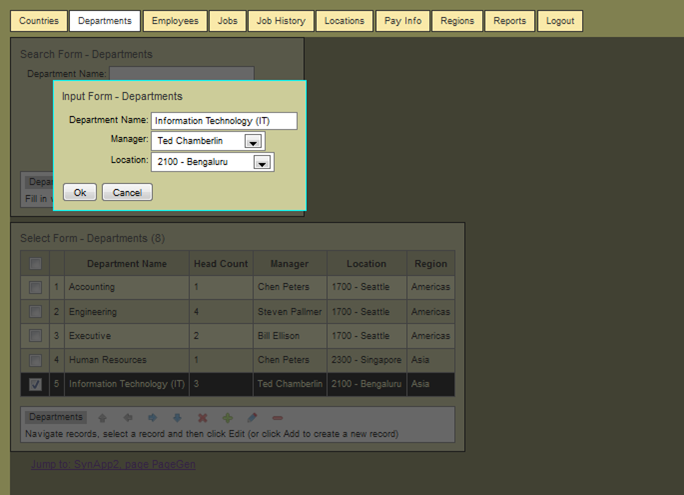
Figure 44 - the Manager and Location items in the list boxes are more complete
The Manager and Location value expansion is reflected in the list boxes.
The Report Form and PDF report for Departments, after customization.
The Report Form and PDF report for Employees, after customization.
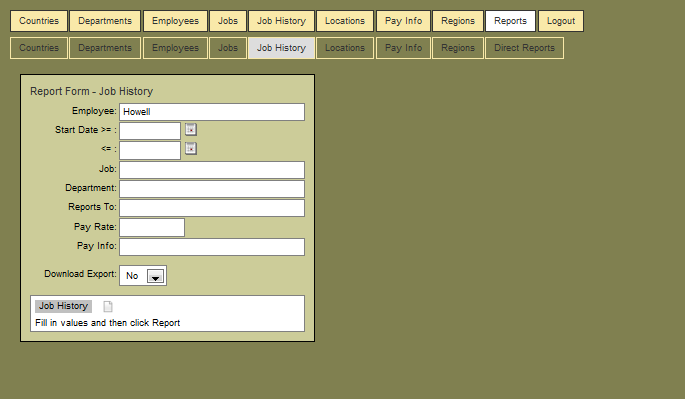
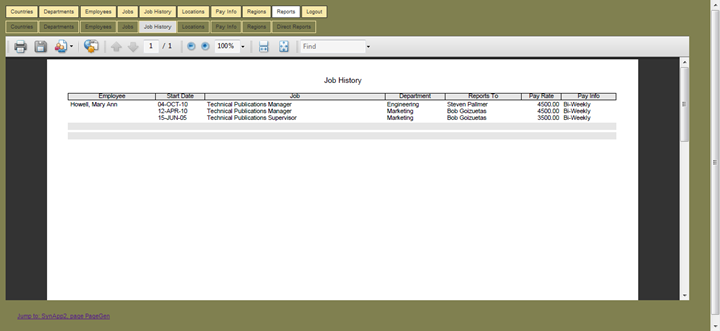
The Report Form and PDF report for Job History, after customization.
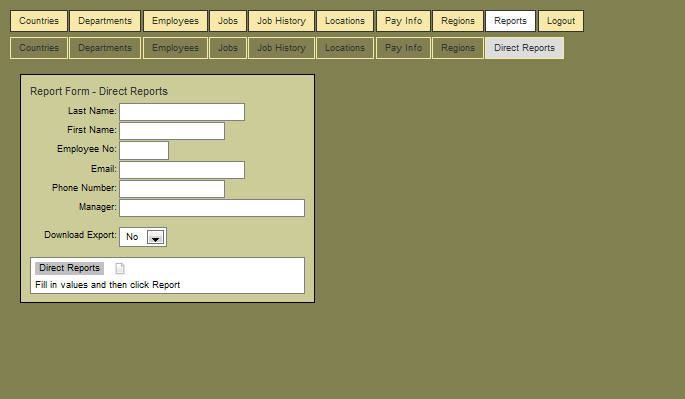
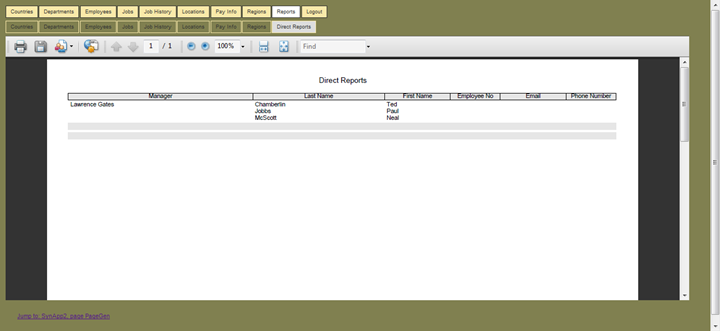
The newly created Report Form and PDF report for Direct Reports.

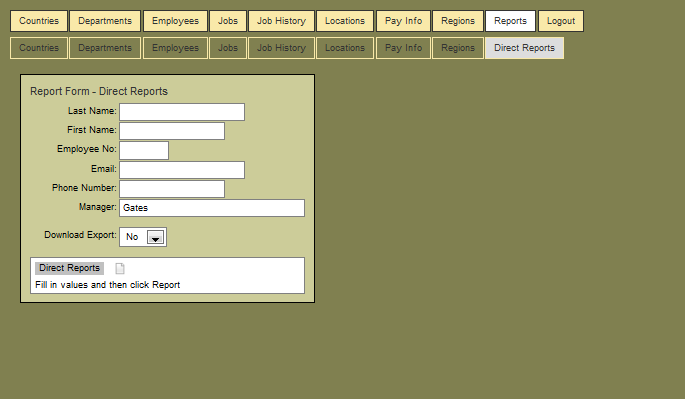
Answering the question: Who reports to manager Gates?
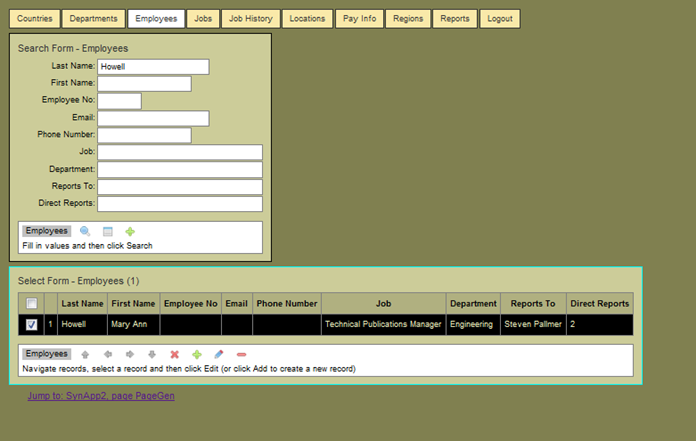
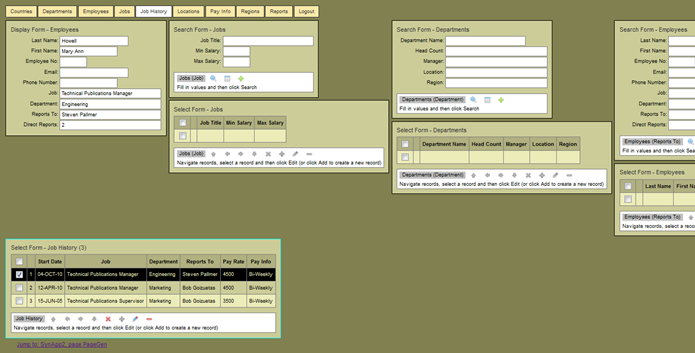
Various ways to answer the question: What is the job history (or current position) of employee Howell?
Beyond the basics
The customized pages and reports show what can be done with a minimum of effort. There are still lots of things that can easily be done to remove unnecessary clutter and include useful detail. There are very straightforward ways to introduce validation and specialized processing.
One example of specialized processing can be demonstrated by copying the sql_export.htm page and oci_export.php files into the HRV2 application directory. The custom.inc.php file, we copied earlier, already has the few lines of code needed to integrate the page and invoke the process implementation.
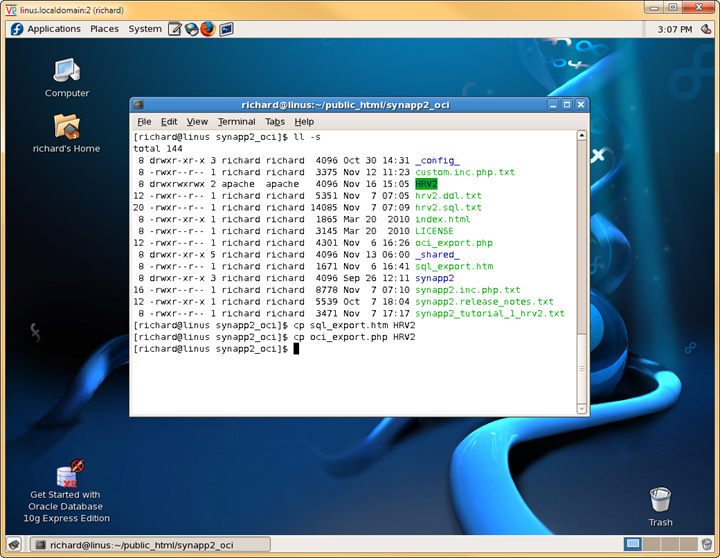
Figure 45 - copying the custom processing files
Once the two files are in place, navigate to a different tab or refresh the current page of the HRV2 application. A new tab for Export Sql appears.
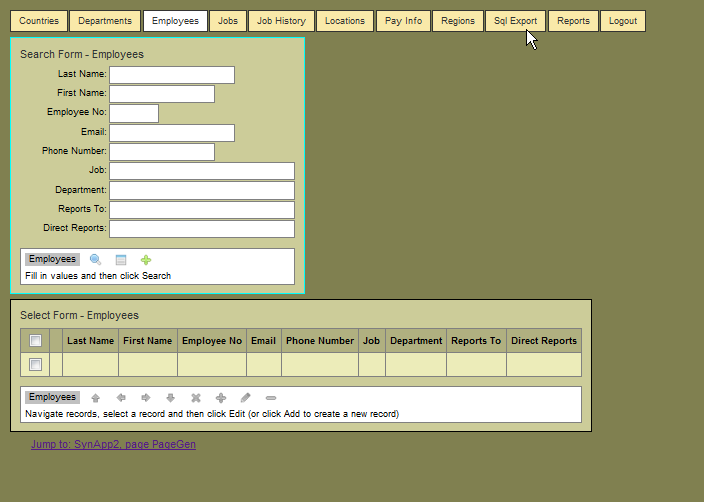
Figure 46 - the new Sql Export tab appears
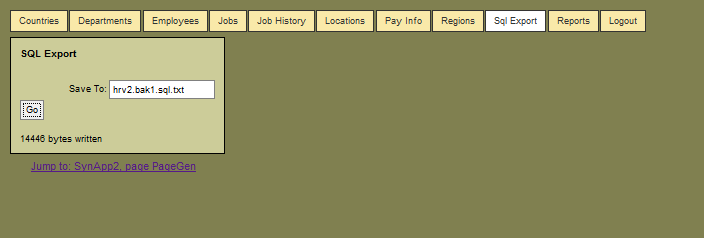
Figure 47 - the Sql Export implementation saves an SQL dump of the entire database
Use the Oracle utility Generate DLL to capture a dump of the database structure.
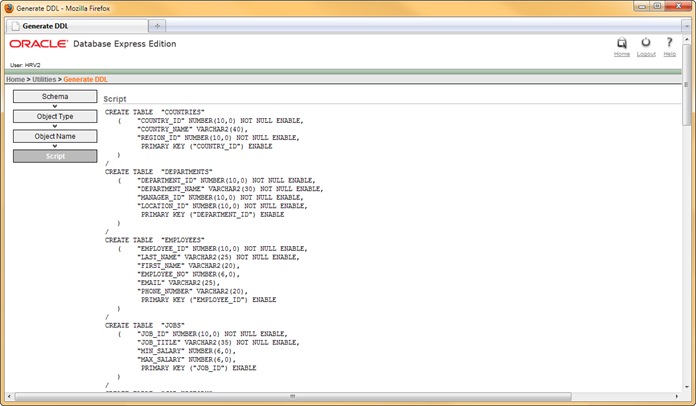
Figure 48 - output from the Generate DDL utility
By using both Sql Export custom processing and the Generate DDL utility you can create a complete backup of a database. The database can be restored or copied to a new database user by submitting the dumps as PL/SQL scripts from SQL*Plus. That’s exactly how the tutorial example database was set up.
Virtually every page in SynApp2 itself, and the generated applications is a variation on the page source you see below.
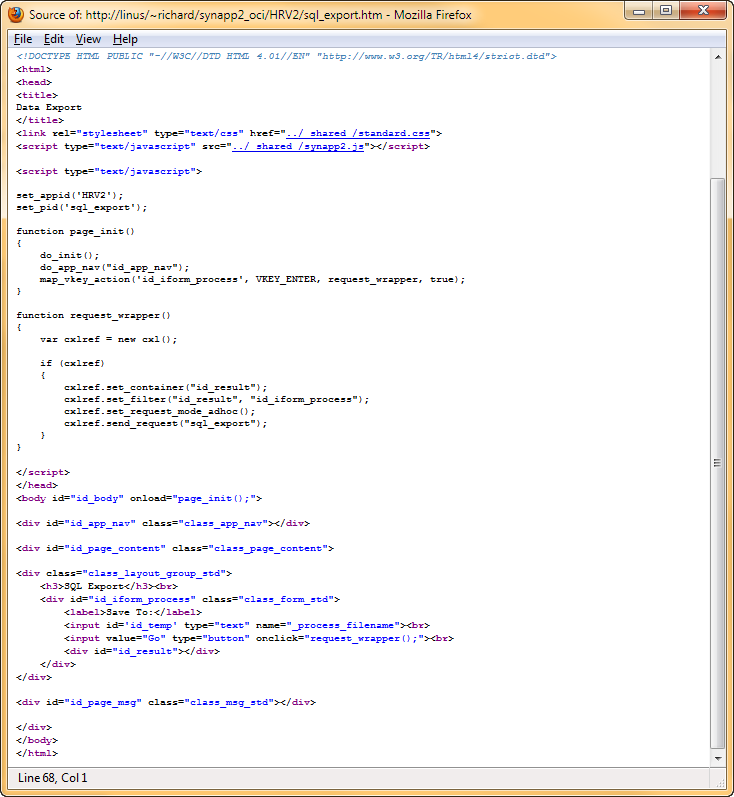
The SynApp2 Web Application Generator is itself a 'SynApp2' application, supported by the SynApp2 MVC Framework. If you study the source code, you will see many examples of how to interface with the framework.
Wrapping up
Users of SynApp2 generated applications like how they work, especially compared some of the Oracle-based applications they’ve had experience with.
At best, you can deploy SynApp2 generated applications to your clients. And, at the very least, you’ll have an extremely high-functioning prototype upon which you can confidently base your design and development decisions for another implementation.
Even if you are absolutely required to create and deliver your ultimate solution with APEX or other product within the Oracle environment and available toolsets, you can still realize tremendous value from SynApp2 as a modeling and test platform. SynApp2 is a dream when it comes to adapting to changes in the database structure.
Take a little time to get up to speed on SynApp2.
If you’d like to try the tutorial yourself, follow the instruction in the Setup Guide.
SynApp2 Setup Guide - A Human Resources Application for Oracle® Database
http://www.synapp2.org/patterns/synapp2_tutorial_1_hrv2_setup.htm
Once you have completed the tutorial setup, you can work through the steps using this presentation as a guide.
Other SynApp2 Resources
The setup kit for the HRV2 application, complete with DDL and SQL sample data is needed to work the tutorial.
http://www.synapp2.org/documentation/synapp2_tutorial_1_hrv2.zip
Or
http://www.synapp2.org/documentation/synapp2_tutorial_1_hrv2.tar.gz
You can review or install the complete source code of the HRV2 application.
http://www.synapp2.org/documentation/synapp2_tutorial_1_hrv2_app.zip
Or
http://www.synapp2.org/documentation/synapp2_tutorial_1_hrv2_app.tar.gz
Updated: 18-NOV-10
© 2010 Richard Howell. All rights reserved.
SynApp2 – Web Application Generator and MVC Framework